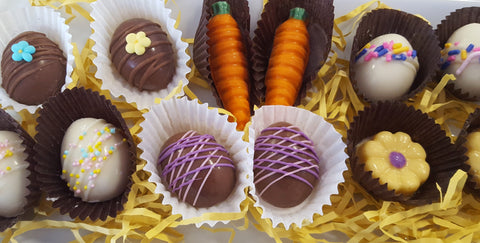
Making Chocolate Filled Candy
Are you ready to get creative and make some delicious homemade chocolate candy? Well, buckle up and get ready to have some fun! In this post, we'll show you how to make chocolate-filled candy using chocolate molds and pre-made candy fillings. This is an easy way to make fun and tasty treats for Easter, Valentine’s Day, Christmas or just because!
First things first, let's talk about the chocolate. We love, love, love Merckens candy melts. They are delicious and very easy to work with. You can use dark, milk, or white chocolate candy melts - your choice, use whichever you find the most tasty! If you want to add some color to your chocolates, you can use the pre-colored candy melts or color your white chocolate with oil-based or powdered food coloring. We don’t recommend using the gel-paste food colors to color chocolate as the water in the gel-paste will cause the chocolate to seize.
The beauty of using Merckens candy melts is that they are tasty and there is no tempering required. You simply melt them in the microwave or a double boiler. If you're using a microwave, place the candy melts in a microwave-safe bowl and microwave them in 30-second intervals at 30-50% power, stirring between each interval until they're completely melted. A lot of the melting happens during the stirring process so don’t skimp on this step!! If you're using a double boiler, fill the bottom pot with a few inches of water and bring it to a simmer. Place the top pot on the bottom pot and add the candy melts, stirring until the candy melts are completely melted making sure no water gets into your melts.
If your chocolate isn’t getting thin enough, you can add some paramount crystals to help thin it. Use about 1 TBSP per pound of chocolate and stir, stir, stir. You can also use other fats like Cocoa Butter, Shortening or Coconut Oil.
It is always better to melt your chocolate slowly. If you try to melt it quickly with high heat, it is very easy to burn and then you will be sad/mad. So remember to have patience with the melting process!
Now that you are an expert in melting your chocolate, let's get back to making chocolate-filled candy. Here's what you'll need:
Ingredients:
- Chocolate candy coating (dark, milk, white or color of your choice)
- Pre-made candy fillings (coconut redi-center, caramel, peanut butter, etc.)
- Flavorings (optional)
- Sprinkles or other decorations (optional)
Tools:
- Chocolate mold with a deep center
- You can use plastic, polycarbonate or silicone molds. We like the plastic chocolate molds because they are inexpensive and easy to use and we are all about making our lives easier! The plastic molds also come in a wide variety of shapes and sizes so you have a lot of options!
- Your plastic chocolate molds are not dishwasher safe and should be washed with warm water and dried with a soft cloth. Do not use soap to clean your mold. Soap will leave a residue that will impact how the mold works.
- Double boiler or microwave
- Piping bag, squeeze bottle or spoon to use to fill your molds
- Bench scraper or other tool with a flat edge to use to scrape the top of the mold
- Parchment paper for setting the chocolates
- Optional Tools
- Fondue pot or slow cooker to keep your chocolate warm. Make sure it has a LOW temperature setting so the chocolate doesn’t get too warm
- A heating pad can also be used to keep chocolate that is in a piping bag or squeeze bottle warm

Instructions:
- Melt the chocolate candy melts using a double boiler or microwave following the instructions above.
- To make the shell of your candy, fill the chocolate molds with the melted chocolate. Spoon or pour the melted chocolate into the chocolate mold, filling each cavity to the top.
- Let it sit on a flat surface for a couple of minutes to let it start to harden and then turn it upside down over some parchment paper to let the chocolate drain.
- Use a scraper to scrape across the top of the chocolate mold to make sure you have a nice clean edge on your shell.
- Now put your chocolate mold in the refrigerator for a few minutes to allow it to set.
- Add the candy fillings. Once your shell has set, pull the mold out of the refrigerator. You can use any type of candy filling that you like. Coconut is always popular but caramel is our personal favorite. Mold your filling into a shape similar to the shape of your mold and press your candy filling into each cavity. Other popular candy fillings include buttercream or peanut butter. You can also use a fondant candy filling and flavor it with one of our many candy flavors!
- Now it’s time to put the backs on your candies! Use a piping bag, squeeze bottle or spoon to fill each cavity with more chocolate.
- Fill each cavity all the way to the top and use your scraper again to scrape the back of the chocolate mold so you have a nice clean edge on your chocolates
- Put your chocolate mold into the refrigerator and let it set for 10ish minutes. The amount of time will vary depending on the depth and amount of chocolate you have used for your mold. You can tell when the chocolate is set as it will begin to pull away from the edges of your mold.
- Remove the chocolate from your mold by turning it upside down and gently tapping it. If the chocolate doesn’t easily release from the mold, that usually means it is not set yet and needs to go back in the fridge for a few more minutes.
- If you want to add some decoration to your treats, you can drizzle them with some melted chocolate and then add sprinkles to the drizzle. We also like using small flowers or carrots made from royal icing to decorate our treats.
- Enjoy!!! Once you are done, don’t forget to taste one (or two) and then store your chocolates in an airtight container. Your candies can last for several weeks at room temperature in an airtight container.


